|
Mailing list allows you to send mail to multiple users. The
Mailing Lists feature is implemented through EZMLM/IDX
MAILING LIST MANAGER (www.ezmlm.org).
A comprehensive FAQ for ezmlm can be found at
http://gd.tuwien.ac.at/infosys/mail/qmail/ezfaq/.
Here you will learn how to:
Adding and Creating Mailing Lists
To create a mailing list, do the following:
- Select Mail Info in the
Mail Info menu.
- Click Add New Mail Resource
at the bottom of the page. A new form
appears:

- Choose Mailing List from the
drop-down box above.
- Agree to additional charges if any.
- Create the mailing list using the form that appears:

- Enter E-mail address: This is the e-mail
address from which mail will be forwarded to
subscribers.
Important: you can only enter a new e-mail
address. If you need to use an existing address, first
delete the resource that uses it.
- Comment: add a comment that will help you
identify this address among other mail resources, if
needed.
Note: to remove a mailing list, click the Delete icon in the
Mailing List Properties section .
See below how to configure the
mailing list according to your needs.
Configuring a Mailing List
To configure a mailing list, do the following:
- Click the name of the mailing list. Its properties will
show on the right.
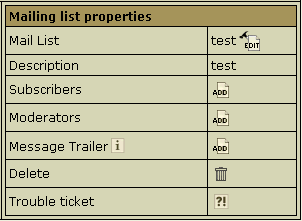
- Click the Edit icon next to
the Mailing List name.
- On the page that appears, choose the preferred settings.
See below for details.
- Click the Submit button to save changes.
For profound information on how to configure your mail list
please read documentation at
www.ezmlm.org)
Now let's take a closer look at some of the options.

Enter the e-mail address that enables mail list
subscribers to report their problems or error messages
sending requests to your_mailinglist-owner@domain.com.
Since EZMLM can take care of virtually all requests
without human intervention, the list owner may read mail
only infrequently.

By default, all messages sent to a list are kept
archived. This way, subscribers can later retrieve messages
from the archive. For instance, subscribers haven't been
following the list for a while, or they just want to see the
discussion of a specific question.
E.g.: retrieve one message at a time with the -get
command:
your_mailinglist-get.123@domain.com (get
message 123)
Read more on commands to
access the ezmlm message archive.
* The archive is also used to create
digests.
Check Not Archived to disable archiving the messages
sent to the list.

You can prohibit the overall access to the archive and
authorize only moderators to get at it.

Here you can restrict the access to the mailing list archive
by allowing only subscribers retrieve the archive.
Non-subscribers' requests will be rejected.

Check the Digest box to set up
the mailing list with a digest function. The digest is a
special kind of mailing list extension. Instead of sending
separate messages, it sends out a collection of messages
ordered by digest subscribers collections of messages.
Digest is sent out when a predetermined time or traffic
limit has been reached. Receiving digest is very convenient
for users who want to follow a list, but not to participate
in the discussion. Digests contain each message as it was
sent out by the list. No editorials, no missing messages. If
the list owner has chosen to restrict posts and archive
access to subscribers, digest subscribers are automatically
given the same privilege.
From the subscriber point of view, the digest list for the
mailing list your_mailinglist@domain.com is called
your_mailinglist-digest@domain.com. You use
the same commands to work with digest as you do when you
work with the main list. The only difference is that you use
your commands with 'digest' indication.

Check "No prefix" to prohibit adding prefix to the
subject line of each message that does not already contain
it. If you want the subject line of each message that does
not contain it, to include the prefix, place the text in the
file DIR/prefix

Usually an applicant for subscription (your_mailinglist-subscribe@domain.com)
is sent a confirmation request. To confirm it, one should
just reply to the message. When it is done, recipient's
address is added to the database and he becomes a
subscriber.
This verification mechanism tests if the person at the
subscription address really wants to be a subscriber. You
can always include or exclude confirmation from the
subscription procedure.

Mailing lists may use subscription moderation. Subscription
to these lists is identical to the process described
above, except that after confirmation the request is
passed on to the list moderator(s). One becomes a subscriber
only after his request has been approved by a moderator,
i.e. he replies to the ``Reply-To:'' address.

In special cases, the list owner may set up the list to be
message moderated. On a message moderated list, messages,
instead of going directly to the list (to send messages to
the list, one must know its name. If the list is called
mailinglist@domain.com, just send a message to
mailinglist@domain.com), are sent to one or more
moderators. They can accept or reject, but not modify the
message. If the message is accepted, it is sent to the list
unmodified. If it is rejected, it is e-mailed back to the
sender, optionally with an explanation from the moderator.
On moderated lists it may take a little longer for the
message to reach all the subscribers, since it has to be
read and approved by at least one moderator before being
sent out to the subscribers.

Here, you can allow remote administrators to edit the text
files that make up most of the ezmlm responses. Replies are
sent only if the target address is a remote administrator.
With this switch, ezmlm replies to the -edit command with a
list of the files in dir/text/. Only files where
editing seems reasonable are included in the list. The
remote administrator can edit any file in dir/text/
by sending e-mail containing the new text to -edit.file
where ``file'' is the name of the file replaced (edited). In
reply to this command, ezmlm sends a message with the file
and editing instructions. A ``cookie'' based on the date,
file name, and contents of the file is added to the
``Reply-To:'' address. The cookie becomes invalid as soon as
the file has been changed, or after 27 hours, whichever is
shorter. Also, the cookie cannot be used to edit any other
file, even if the other file has exactly the same contents.

Here you can disable posting by subscribers to the mailing
list, so they will only receive messages posted by
moderators. This is usually chosen to send announcement or
notifications where the interaction between recipients is
not intended.

A remote administrator is an address with the rights to do
certain administrative tasks remotely by E-mail. Depending
on how the list is configured, remote administrators may
have the right/ability to list subscribers, search for
subscriber addresses by name, add and remove subscriber
addresses and/or edit the texts that are sent in reply to
list commands.

Mailing list users are not allowed to list the addresses of
all subscribers. Still, you can allow remote administrator
to get it. The subscription log stores entries for each
modification made to the subscriber database. Remote
administrators can list this log or search it for specific
entries. For example, listing this file allows the remote
administrator to see recent additions and removals.

You can set up your mailing list to allow posts from
subscribers only. In this case posts received from
non-subscribers will be rejected and sent back.

If you enable this function, users will be required to
request to the remote administrator in order to retrieve
mail list archives. Otherwise, archive will be accessible
only to the remote administrator.
Adding Subscribers to your Mail List
Subscribers are the recipients of your newsletters. The
total number of subscribers is displayed in the brackets.
To add subscribers to your mail list, do the following:
- Click the name of the mailing list. Its properties will show on the right.
- Click the Add icon next to the Subscribers name.
- Enter subscriber's email in the Add subscriber field. To add
several subscribers at once, enter their e-mail addresses separated with
line break in the Batch subscribers creation field:
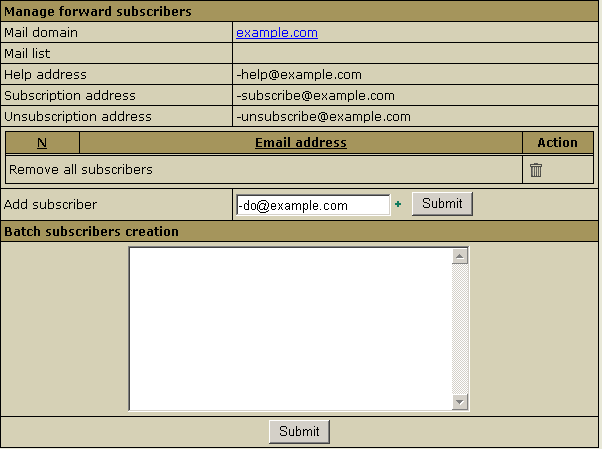
- Click Submit.
Removing subscribers:
- To delete subscribers one by one, click the Delete icon next to the
subscriber.
- To mass delete all subscribers, click the Delete icon in the
Remove all subscribers field.
To send a message to a mailing list, send the newsletter to
the mail list e-mail address using WebMail or any mail
client such as Outlook Express.
Adding Moderators to your Mail List
Moderators approve of message posts and requests for
subscription. Individual moderator's addresses are kept
secret, even from other moderators.
To add moderators to your mail list, do the
following:
- Click the name of the mailing list.
- Click the Add icon next to the Moderator
name.
- Add a new subscriber by submitting your entry.
- To add several subscribers at once, enter them in a
Batch Subscribers Creation field.
There can be several moderators, both for messages and
subscription:
- Message moderators allow messages to be sent
to the mail list. The message will be passed on to the
mailing list subscribers only if a moderator approves
it.
- Subscription moderators allow people to
subscribe to the list. If at least one subscription
moderator approves the request, the user address becomes
a subscriber.
Important: As a rule of thumb, most lists use the
same addresses for both functions. The total number of
moderators is displayed in the brackets.
Adding Message Trailer To Mailing Lists
(available in version 2.3 and higher)
Message trailer is an additional text you can add to each message. It
usually contains information on how to unsubscribe from the list or some
important information for subscribers. There is one trailer for all messages
within one mailing list. To add a message trailer:
- Click the name of the mailing list. Its properties will
show on the right.
- Click the Add icon next to Message Trailer. The
following page will show:
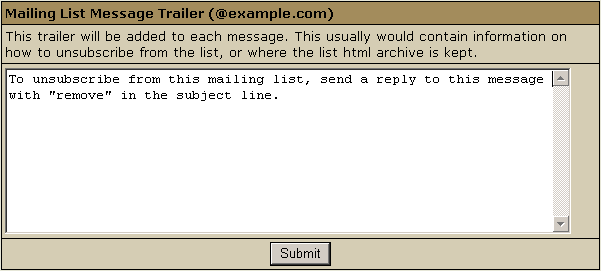
- Enter the text that will be added to each
of your subscribe messages.
- Click Submit.
To edit a message trailer, click the Edit icon next to the Message
Trailer, edit the text and click Submit.
To remove a message trailer, click the Delete icon against the
Message Trailer field.
|